
How to Diagnose Camera System Faults
If your camera head is failing to display an image or light, don’t assume the entire system is broken.
Use this troubleshooting guide to determine exactly where the fault lies.
Step 1: Perform Basic Connectivity Checks
Before testing the internal electronics, rule out simple connection issues:
- Check the Spring: Unscrew the spring from the camera head. Inspect the contacts to ensure they are clean and “springy.” Reconnect it securely.
- Check the Camera Head: Unscrew the camera head. Ensure the connection point is clean, free of any dirt or “muck,” and re-tighten it firmly to the spring.
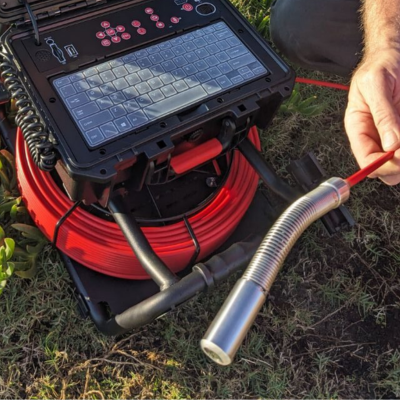
Step 2: Use the Built-in Test Cable to Isolate the Fault
If the camera still has no light or image, you need to determine if the fault is with the main cable, the side control cable, or the control box. Every unit contains a built-in test cable located underneath the keyboard.
The Testing Procedure:
- Access the Test Cable: Lift the keyboard panel to locate the built-in test cable.
- Connect the Camera Head: Take your camera head (and spring) and screw it directly into the female end of the test cable.
- Bypass the Side Cable: Move to the side of the unit, disconnect the current side control cable, and plug in the test cable in its place.
- Evaluate the Results:
- If you have lights and footage: This confirms that your control box is working correctly. You have successfully isolated the fault, proving that the issue lies within the main cable or the side control cable you just bypassed.
- If you still have no image or lights: The issue may reside within the camera head or the internal connection of the test cable.
Pro Tip: Always ensure the unit is powered down before disconnecting or connecting cables to protect the internal pins from damage.
Pro-Tips for Field Success
- Handle with Care: The pins inside your cables are delicate. When pushing or screwing in the test cable, ensure it is aligned perfectly to avoid bending the pins.
- Keep it Clean: Dirt (“muck”) is the number one cause of intermittent signal loss. Always carry a dry, lint-free cloth to wipe contacts before every connection.
- Power Down: Always turn the system off before swapping cables. Hot-swapping can cause electrical shorts or damage the internal diagnostic circuitry.
Need a visual guide?
Watch: How to Troubleshoot Your Camera System Using a Test Cable
“This 2-minute walkthrough shows you exactly where to find the test cable and how to isolate your system’s fault to save time on the job site.”
Need Further Assistance?
1. Order Replacement Parts
2. Speak to a Technician
- Phone: 1800 961 731
- Email: contact@razorbackdrains.au
- Service Hours: Mon–Fri 7AM - 5PM
Why Choose Our Service Department?
- Fast Turnaround: We understand that downtime costs you money. We prioritize repairs for all our professional plumbing and drain-cleaning partners.
- Genuine Parts: Don’t risk your system with aftermarket alternatives. We use original, high-grade components to ensure your equipment performs as expected in the field.